


93K Subscribers
137 Videos
10.7M Views


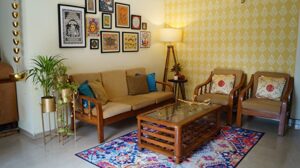
Wall Stenciling Tips
If you want to perk up your space quickly, then wall stencilling is the right option. With a few tools, you can start this project to give your space a much-needed makeover. You need not be very creative and skilled if you are planning to stencil your walls.
Here are the steps on how you can do stenciling on your own.
Supplies that you will need
Stencil of your choice
Stencil brush or foam roller
Paint of your choice
Paper towel
Paint tray
Painter’s tape or spray adhesive
Steps
Before you start, make sure that you do a sample test for color combination and ensure that all your supplies are in workable condition. You can use a portion of a wall that remains hidden like under the basin, in the garage or you can even use cardboard.
1. Prepare the surface:
The first step is to prepare the surface. Choose the wall that you want to stencil and wipe it clean to make it free from dust. Fill the cracks, prime it, and then give it two coats of base paint and let it dry completely at least for 24 hours. Now you are good to go.
2. Positioning stencil:
Always start from the least noticeable place. Position the stencil on the wall and secure it using painter’s tape or spray adhesive. If you are using painter’s tape, two small pieces of tape would be enough to secure the stencil on the wall. If you are using spray adhesive, spray a small amount of it on the back of the stencil, wait for a while, and fix it on the wall.
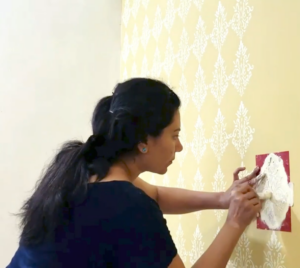
3. Stenciling:
Pour some paint on the tray or palette. Load your stencil brush or foam roller with color. Make sure that if you use a foam roller, it has absorbed color all over it. Now remove excess paint using a paper towel. Just dab the stencil brush on a paper towel until it appears almost dry. If you use a roller, roll it in a paper towel a few times to remove excess paint. This will ensure that while stenciling paint will not bleed. Now you can start stencilling your wall.
Start with tiny circular motions from the edges of the stencil and work your way toward the center of the stencil.
If you use a roller, roll it over the stencil with gentle pressure. Pressing it hard against the stencil can cause the paint to seep behind the stencil. Make sure you do not accidentally roll over the outside edges of the stencil.
When you are done with one stencil, remove it slowly and gently and re-position it on the wall as per your choice. Repeat the step until your wall is done.
Tips:
1. Do not load the brush/roller with an excess amount of paint.
2. If the paint appears light then before removing the stencil, give one more coat of paint using a stencil brush/roller.
3. For crisp lines, use less amount of paint.
4. If you are using different color paint then use a separate brush/roller for each color.
5. You can always wipe off fresh mistakes when the paint is still wet.
6. After the stencil project is over, clean everything thoroughly from palette/tray to brush/roller.
Read Also: Wall Makeover Stories
Here’s the complete tutorial that you can watch on YouTube.
Hope you find these steps and tips to stencil your wall helpful.
Happy Decorating!!!
Disha

I'm always picking up new hobbies, and people often call me inconsistent. But I see it differently. I'm searching for my tribe. Hobby Box is a series that brings together creative, curious multipotentialites who love exploring many interests. Join the tribe. #hobbies #multipotentialite #multipassionate
Having more than one hobby reminds you that you’re a human being, not a single label. You don’t have to be “just one thing” growth lives in exploration. When you explore different skills, you give yourself permission to evolve. Multiple hobbies aren’t distractions, they’re investments in your mental and emotional well-being. Passion compounds. What you learn in one hobby often strengthens another. The more you learn, the more confident you become in starting anything new. A curious mind never gets stuck, it keeps moving forward. Life feels richer when you allow yourself to try, fail, and try again. So come join this bandwagon of learning a new hobby every month :) #HobbyIdeas #projectideas2026 #multipotentialite
I love picking up new skills, and this year I learned so many exciting ones. When I got to know about rug tufting sessions at Go Rug Yourself, I booked a session immediately. This video shows just how amazing my experience was. I spent nearly five hours off-screen tufting a rug, listening to music, and completely unwinding. It was incredibly therapeutic, so much so that I’m already planning to book more sessions with friends and family 🙂 If you’re in Pune and looking to gain some new experience, then here’s the address: Go Rug Yourself Solitaire Business Hub, 705, Balewadi High St, Balewadi, Pune, Maharashtra #rugtufting #diy #hobbies #learnnewskills #rugmaking
Sumba Art Fest is a beautiful amalgamation of tribal art and craft, where you can be inspired by renowned artists as they perform live, buy art directly from the artisans, witness art come to life as the artisans weave their magic, and soak in the beauty of one-of-a-kind paintings created by the late, well-known artist Prof. Raosaheb Gurav. Sumba Art Fest will remain open from 15th to 22nd December. Do stop by if you are in Pune Venue: Pandit Jawaharlal Nehru Sanskrutik Bhavan, Ghole Road #artfest #sumba #sumbaart #indianart #tribalart #artbazaar
About ten years ago, I visited and wrote about “Dastkari Haat,” an arts and crafts bazaar. Tomorrow, I’ll be introducing you to another remarkable space that honors art and artists. Until then, explore this blog and lose yourself in the stunning arts and crafts our country has to offer. https://designdecoranddisha.com/dastkari-haat-the-convergence-of-indian-art-craft/ #art #craft #craftbazaar #dastkari #dastkarihaatsamiti #artisan #handmade #indianart #handicraftsofindia


2 Responses
Very useful article information on wall art. Thanks for sharing. From wall art online
Indian Online Shopping website
Really love it