92.9K Subscribers
137 Videos
10.5M Views


Hello, my creative tribe!
We are doing a wallpaper wall once again. Since many of you just loved the outcome of the previous wall makeover with wallpaper, I thought, “Let’s do it one more time.” So we have a Photowall wallpaper again, this time my parents’ living room wall to transform. Let’s get started!
 |
| Before & After |
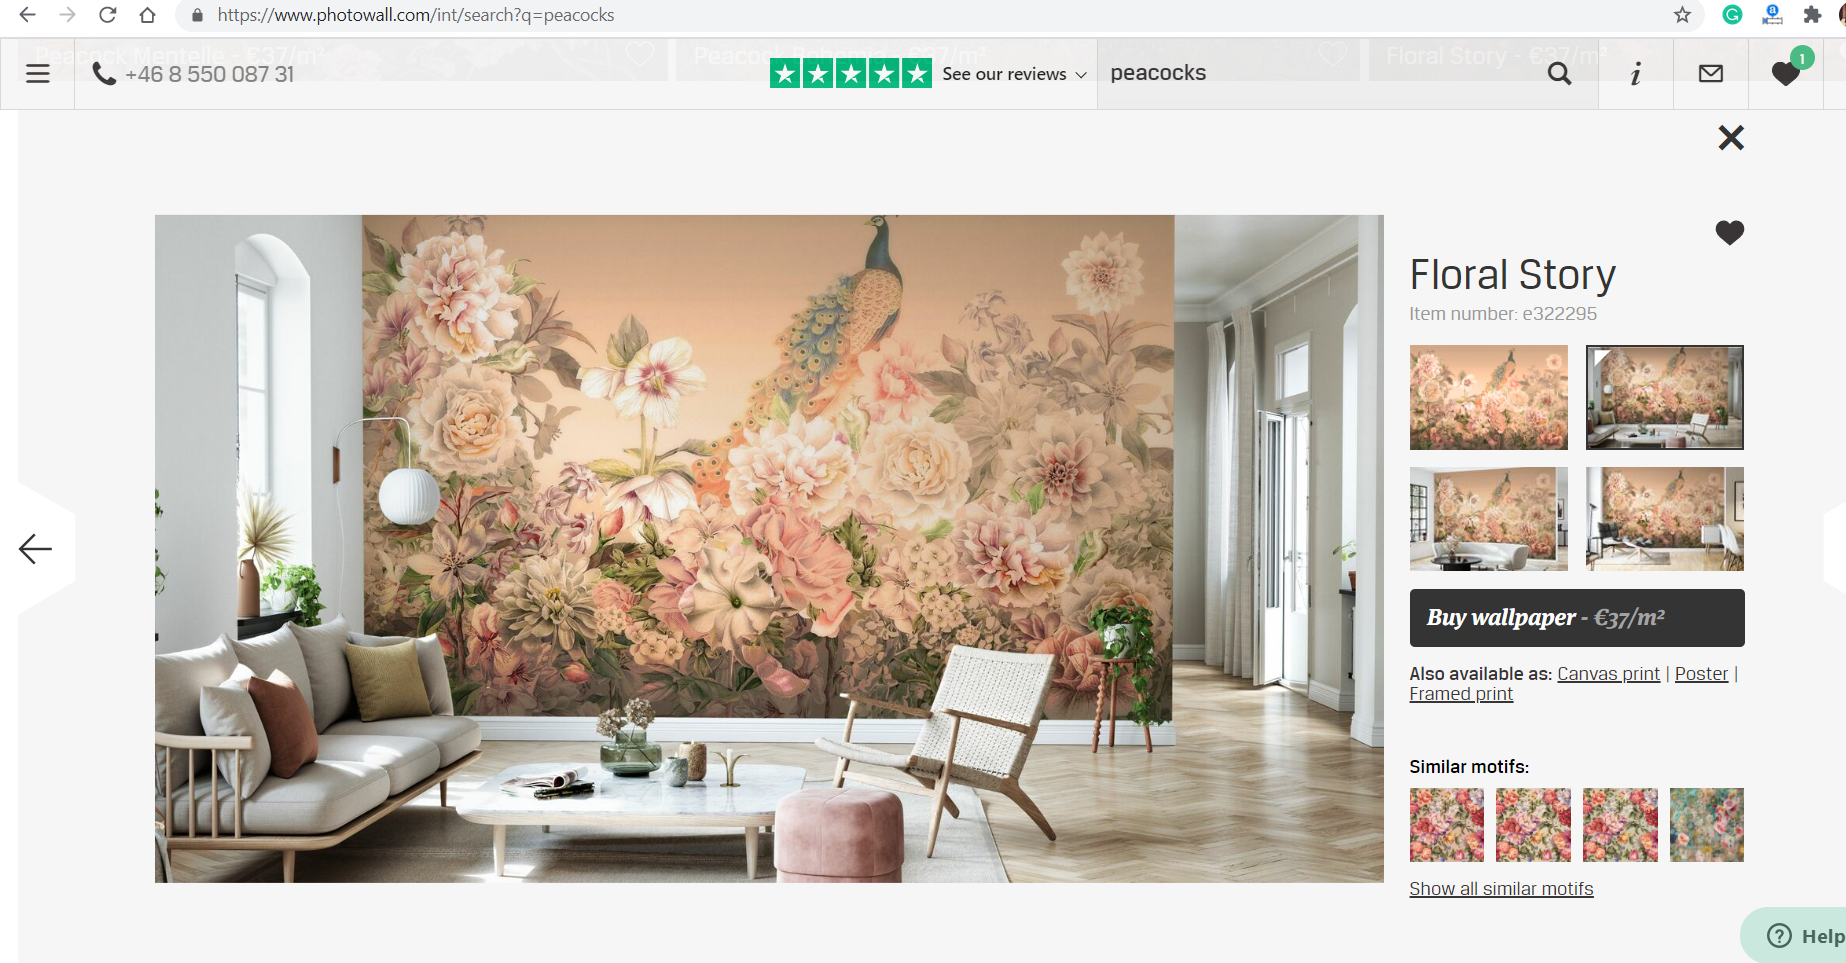
Photowall is a fully digital Swedish company that thinks of a wall as a huge blank canvas and gives its customers the opportunity to be creative and fill that empty canvas with colors and imaginations of their own. They can customize and print all the unique orders instantly. Their Mural wallpapers are a delight and I just couldn’t miss the opportunity to order one for my parents’ living room. Also, how can I forget about you, my dear readers. Here’s a special offer for all 3D readers. If you wish to buy any product from Photowall, you can use code dishapw2021 when you checkout, this code will give you a 25% discount on any product on the Photowall website and is valid for a month. Happy shopping guys!
Now let me show you what my parents chose.
Alright! After placing the order, we got the update from Photowall immediately that the wallpaper is being printed and will be dispatched soon. We received the wallpaper within a week’s time. It was then time to open the package and unroll the beauty. I would suggest you order a wallpaper kit along with the wallpaper as it will make the wallpaper installation much easier. It has all the tools that are needed to hang the wallpaper.
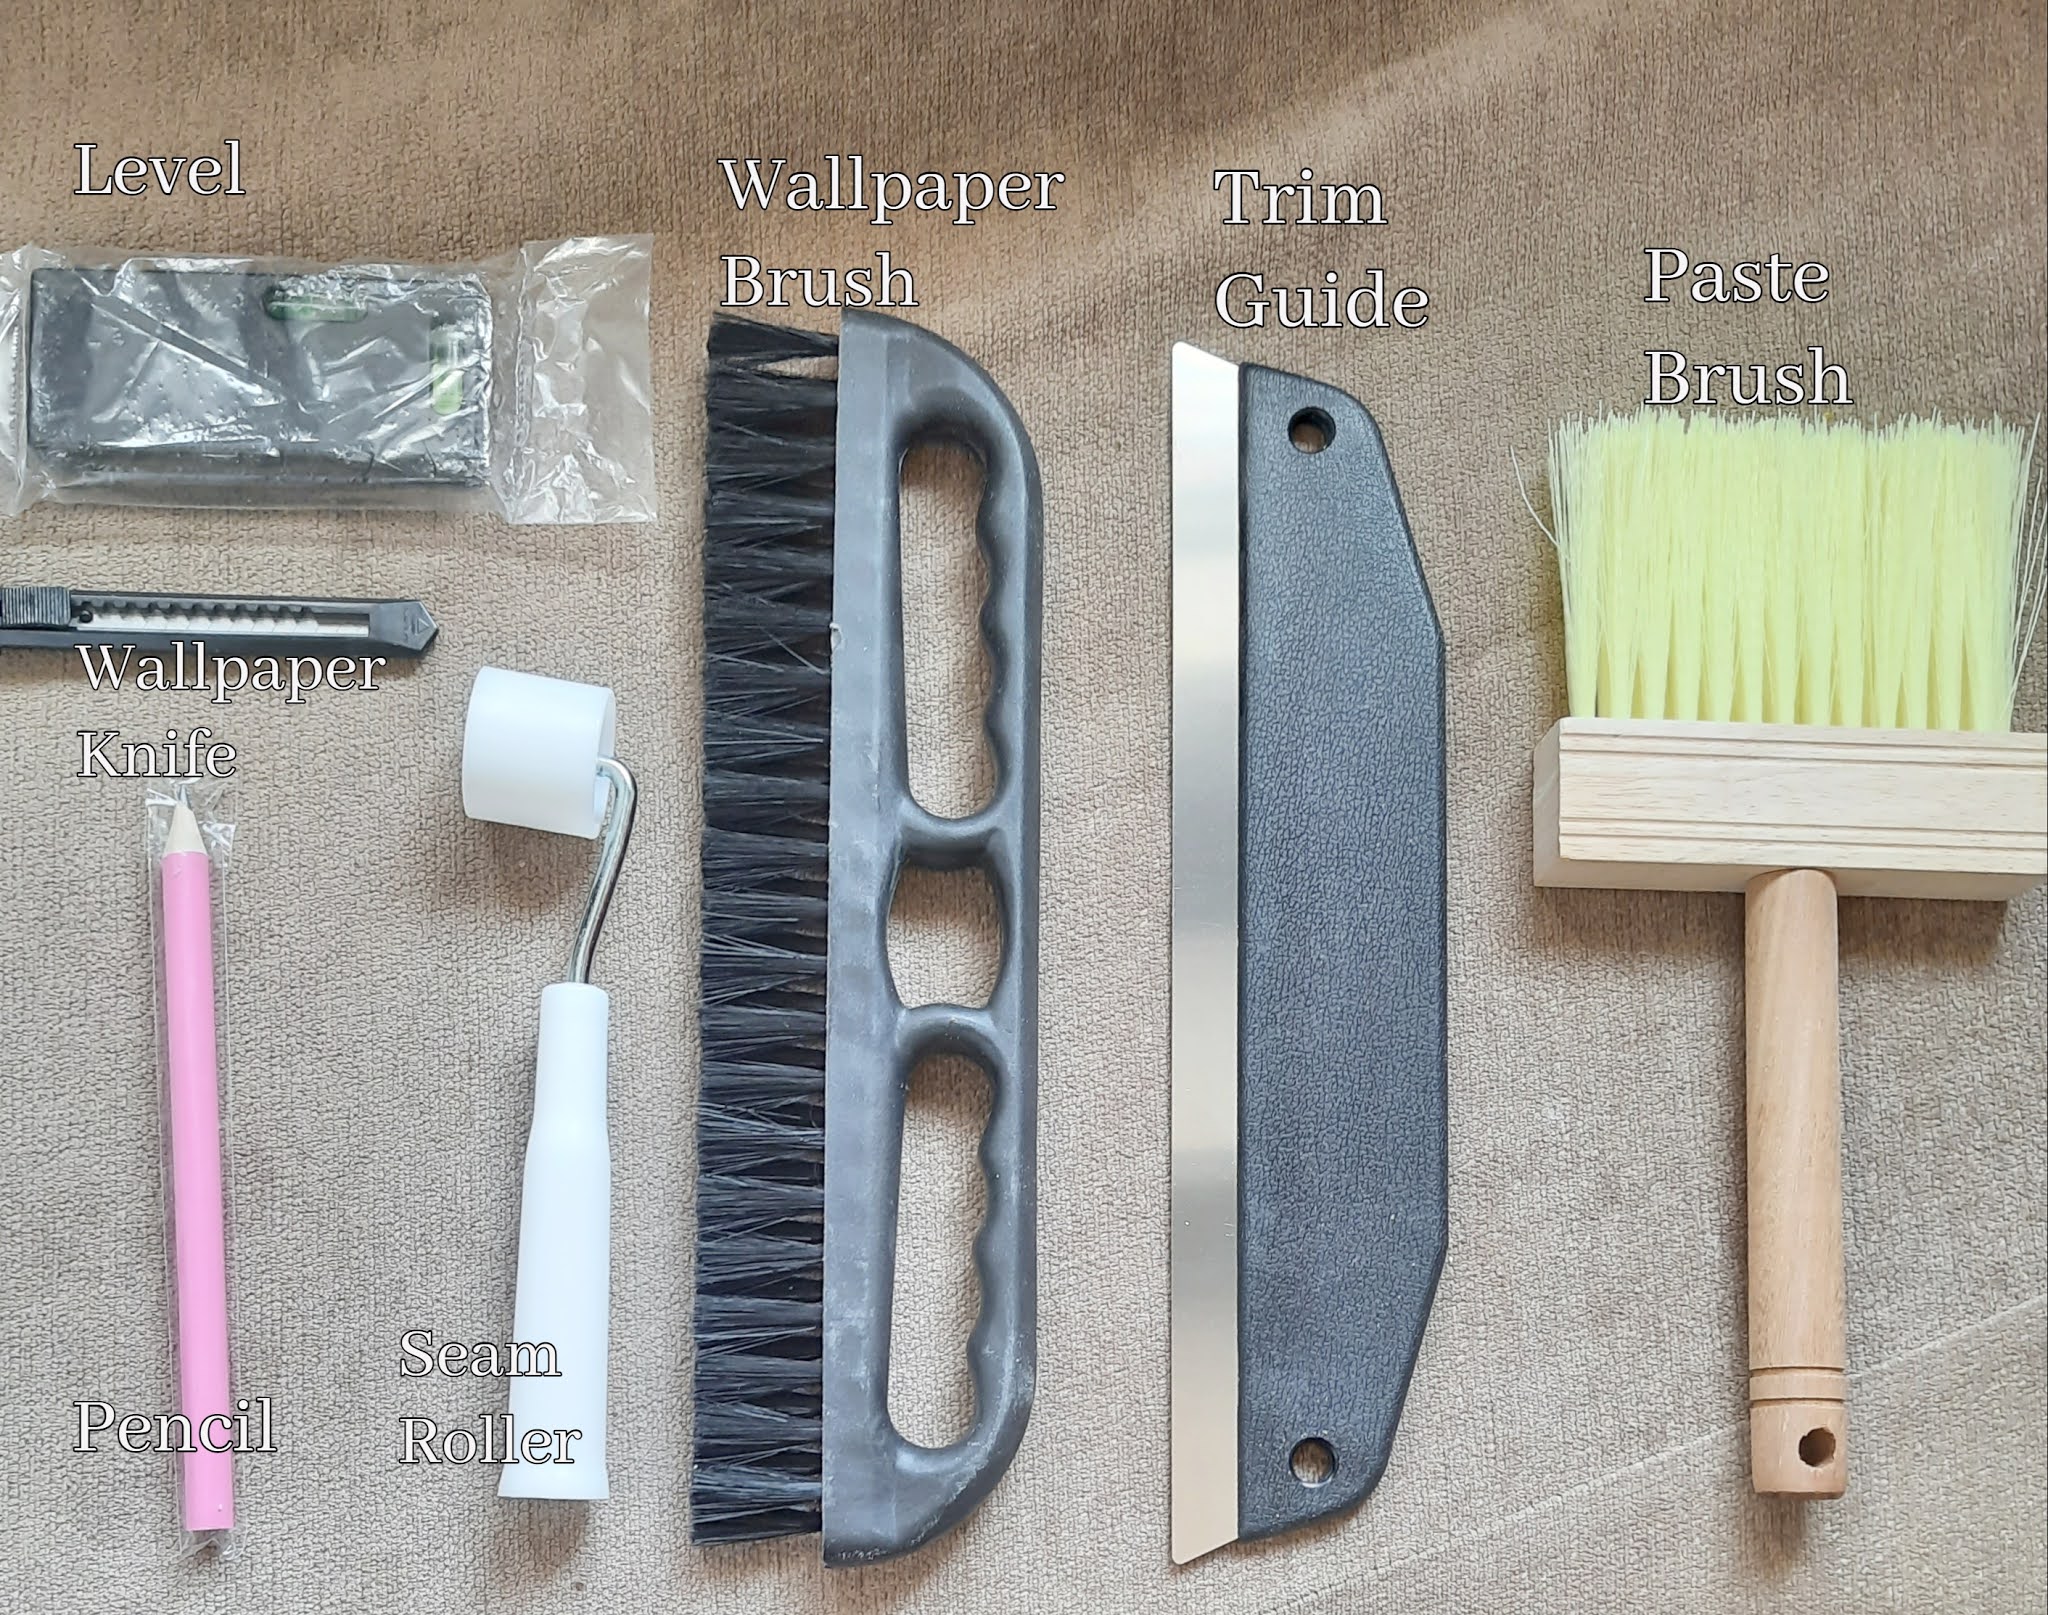 |
| Wallpaper Kit |
An information leaflet that comes with the wallpaper contains all the instructions from cutting to applying the wallpaper. The wallpaper comes in a roll with 8 tiles, each marked with the serial number and the picture of the mural. The first step is to unroll the wallpaper and separate each tile by cutting along the dashed line. Once separated, it can be placed to see how it would look.

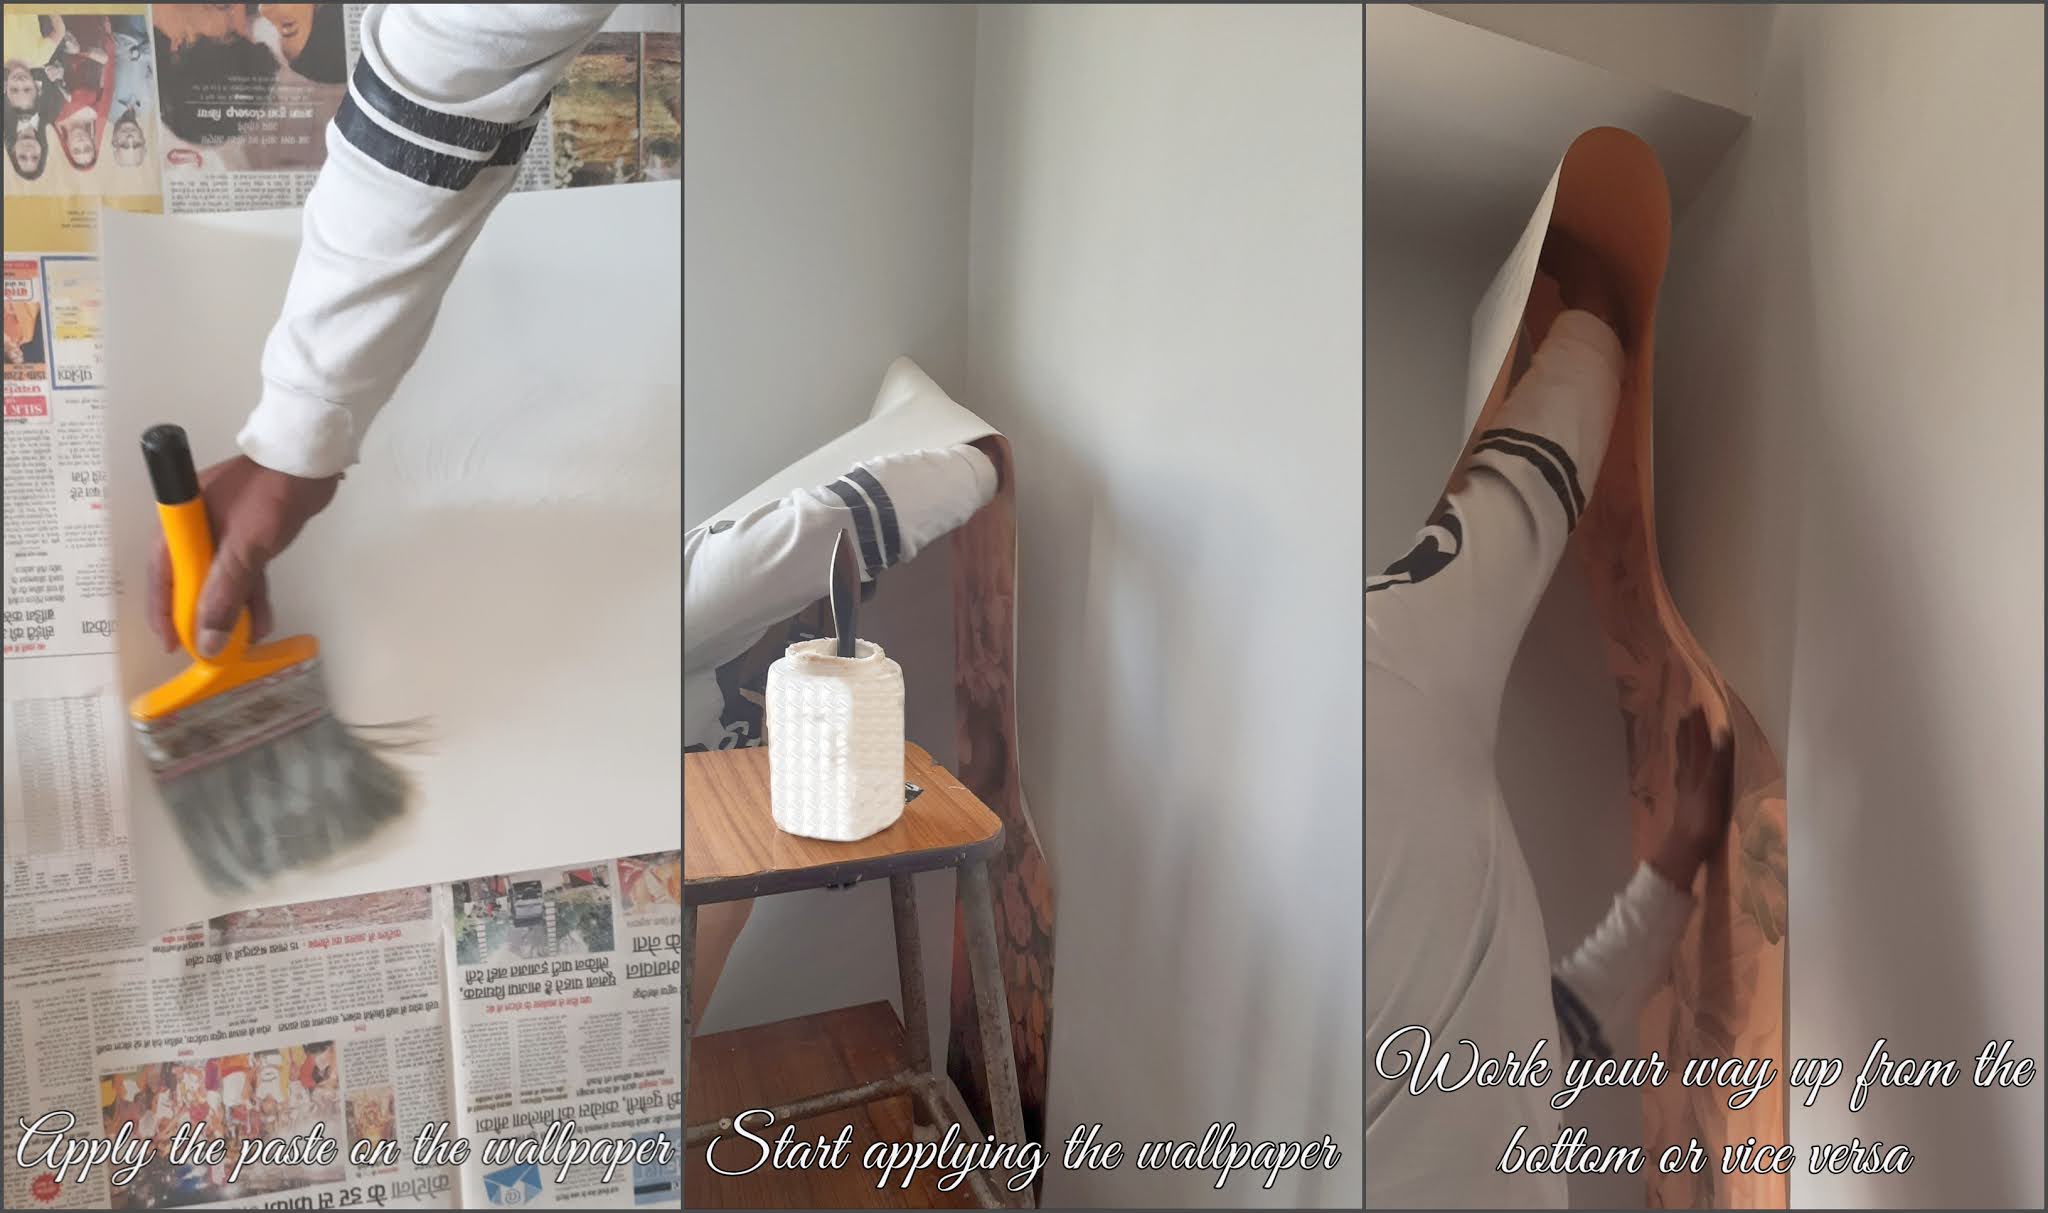
Next, we prepared the adhesive. All the instructions were given on the adhesive pack. So it wasn’t rocket science for us. Once the glue was ready all we needed to do was apply it either on the wall or on the back of the wallpaper using a paste brush. Spread the glue evenly and in an amount that doesn’t make the wallpaper soggy. The better option is to apply the paste to the wall. But we wanted to do it differently this time so we opted for the second option.
 |
| How to hang wallpaper |
Once done wipe the wallpaper with a damp cloth so that there isn’t any trace of the adhesive on the wallpaper otherwise dried adhesive will suppress the shine of the wallpaper and will make the print look dull. Now let me show you how it turned out.
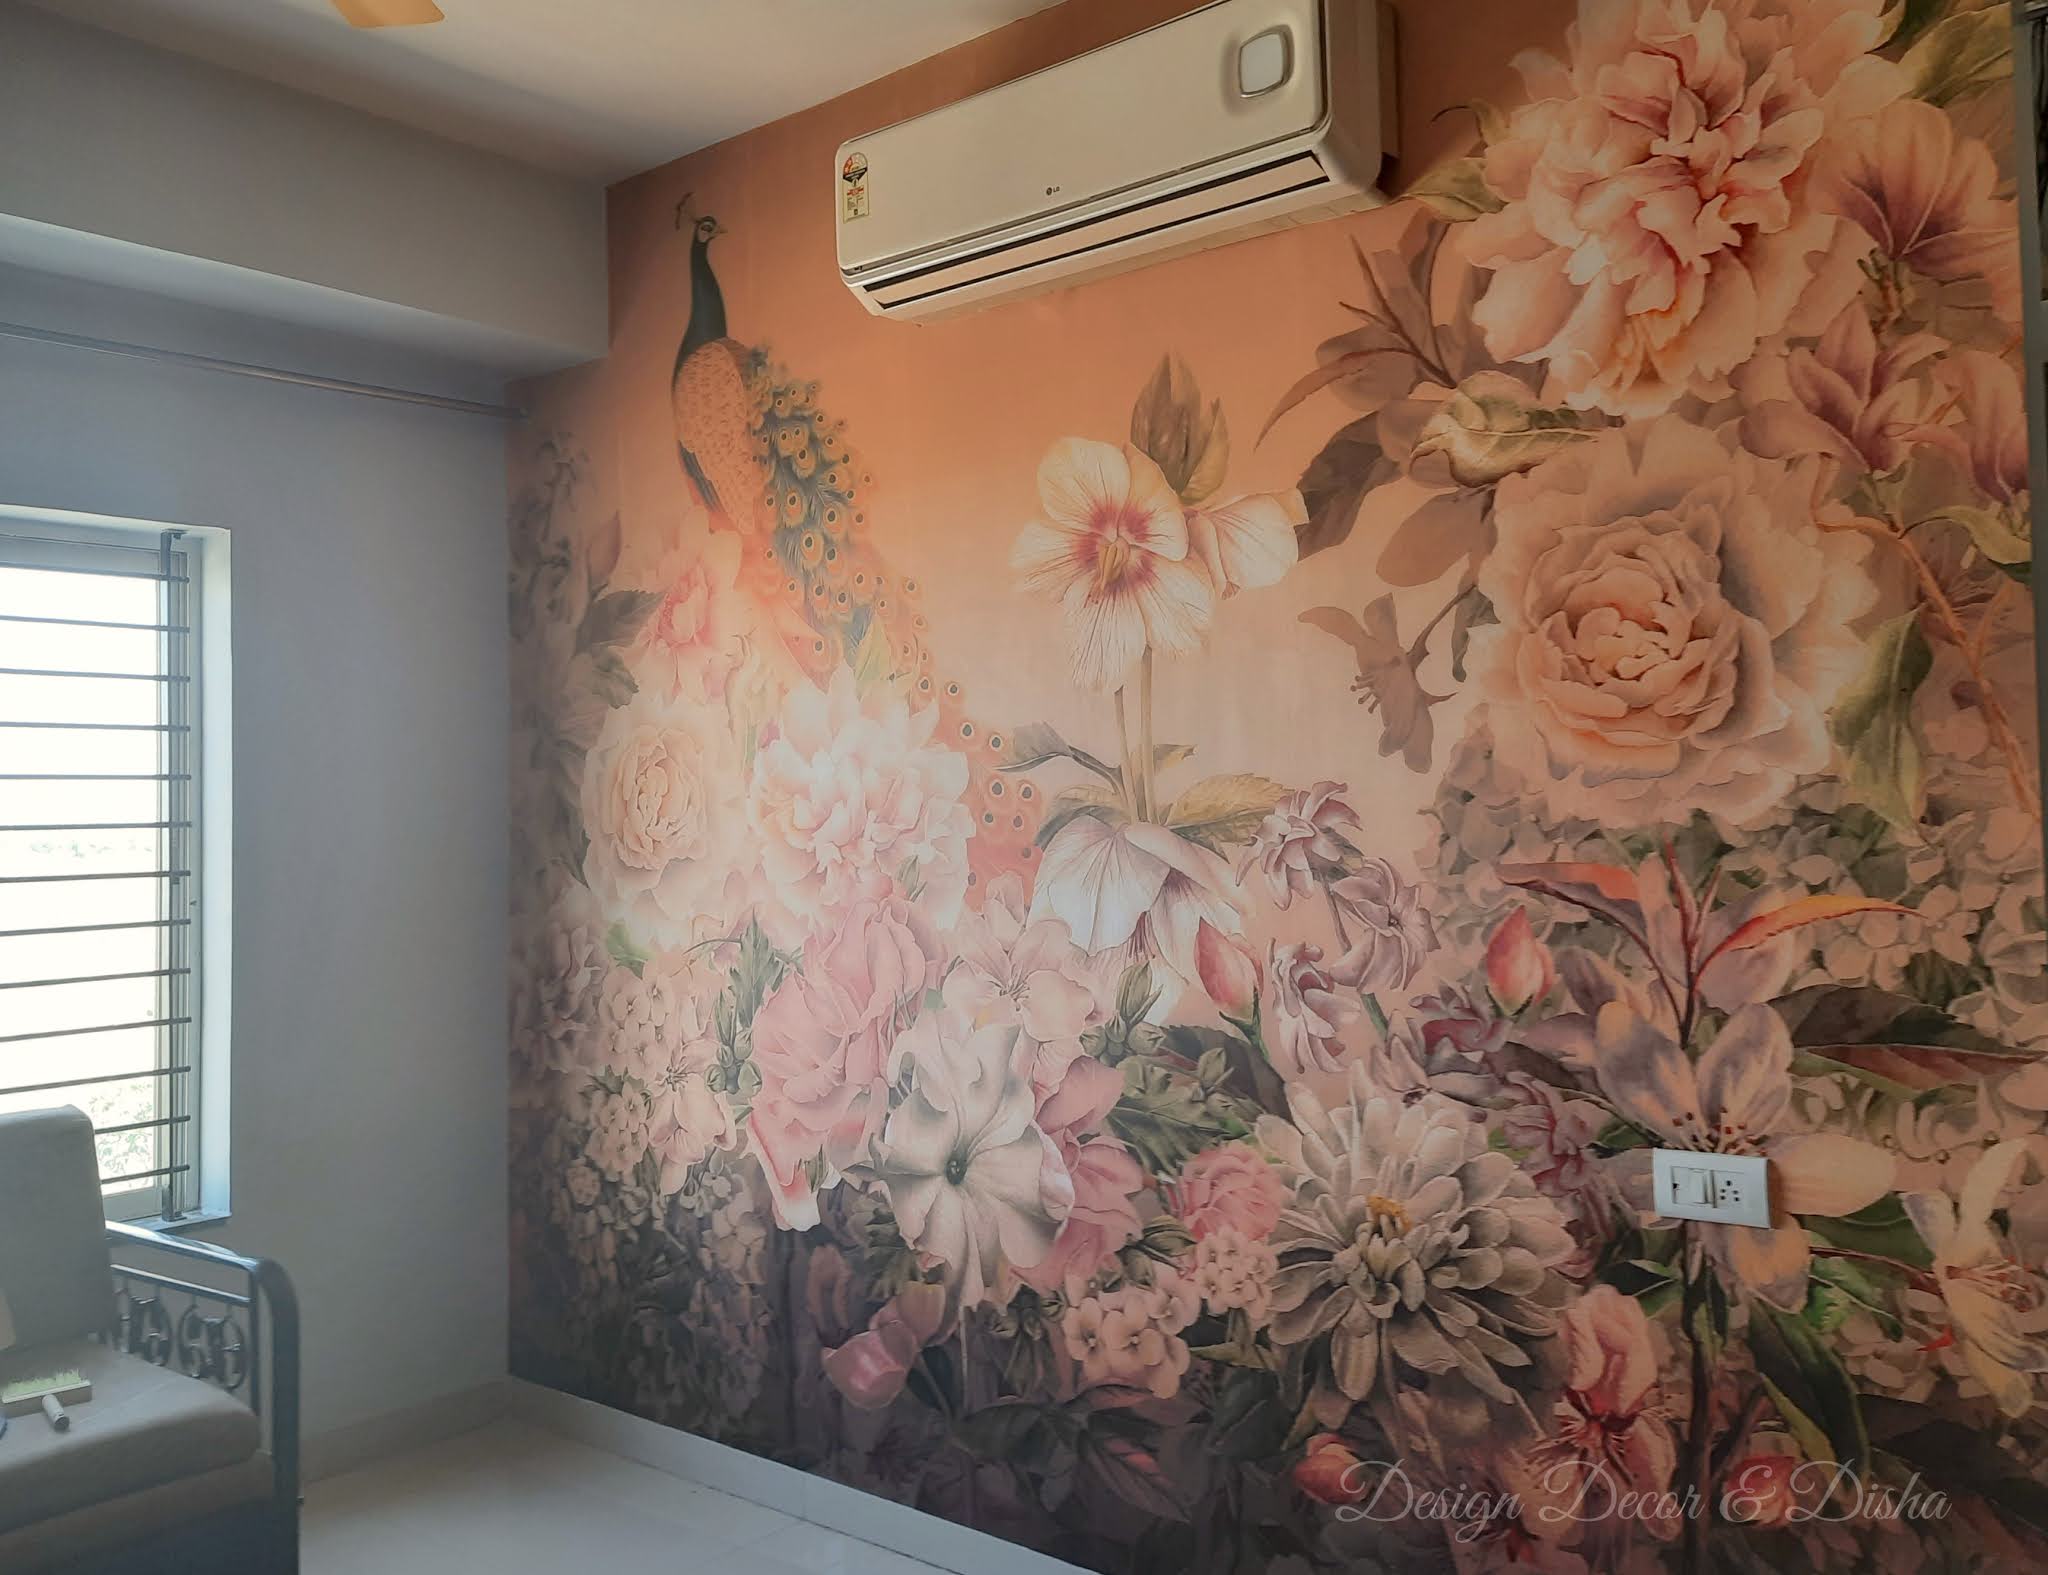 |
| Photowall Mural Wallpaper |
 |
| Before |
 |
| After |
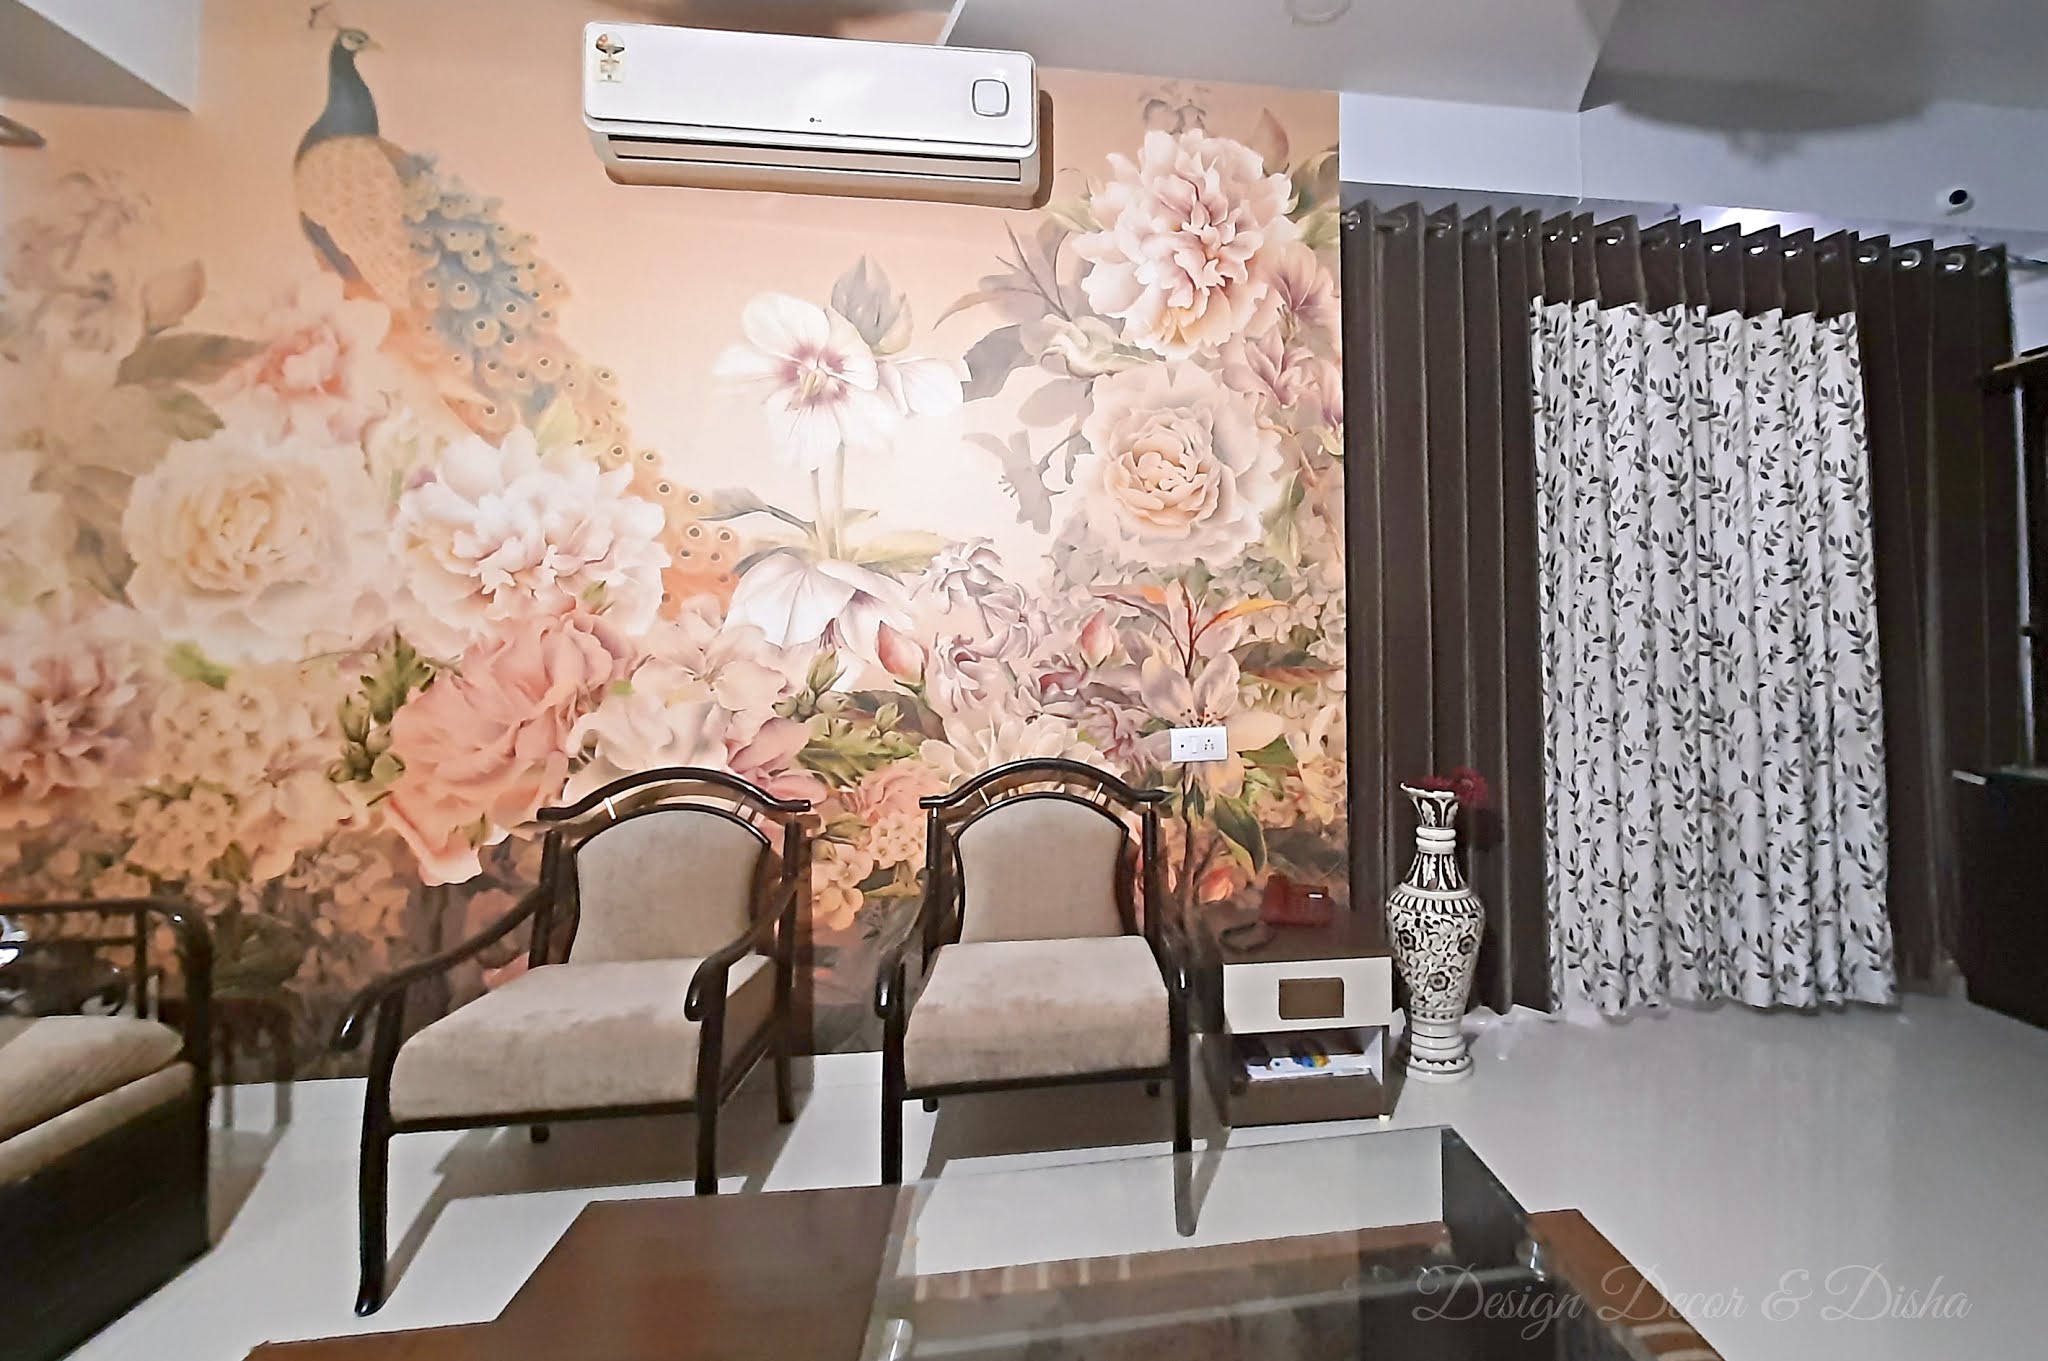 |
| After |

Having more than one hobby reminds you that you’re a human being, not a single label. You don’t have to be “just one thing” growth lives in exploration. When you explore different skills, you give yourself permission to evolve. Multiple hobbies aren’t distractions, they’re investments in your mental and emotional well-being. Passion compounds. What you learn in one hobby often strengthens another. The more you learn, the more confident you become in starting anything new. A curious mind never gets stuck, it keeps moving forward. Life feels richer when you allow yourself to try, fail, and try again. So come join this bandwagon of learning a new hobby every month :) #HobbyIdeas #projectideas2026 #multipotentialite
I love picking up new skills, and this year I learned so many exciting ones. When I got to know about rug tufting sessions at Go Rug Yourself, I booked a session immediately. This video shows just how amazing my experience was. I spent nearly five hours off-screen tufting a rug, listening to music, and completely unwinding. It was incredibly therapeutic, so much so that I’m already planning to book more sessions with friends and family 🙂 If you’re in Pune and looking to gain some new experience, then here’s the address: Go Rug Yourself Solitaire Business Hub, 705, Balewadi High St, Balewadi, Pune, Maharashtra #rugtufting #diy #hobbies #learnnewskills #rugmaking
Sumba Art Fest is a beautiful amalgamation of tribal art and craft, where you can be inspired by renowned artists as they perform live, buy art directly from the artisans, witness art come to life as the artisans weave their magic, and soak in the beauty of one-of-a-kind paintings created by the late, well-known artist Prof. Raosaheb Gurav. Sumba Art Fest will remain open from 15th to 22nd December. Do stop by if you are in Pune Venue: Pandit Jawaharlal Nehru Sanskrutik Bhavan, Ghole Road #artfest #sumba #sumbaart #indianart #tribalart #artbazaar
About ten years ago, I visited and wrote about “Dastkari Haat,” an arts and crafts bazaar. Tomorrow, I’ll be introducing you to another remarkable space that honors art and artists. Until then, explore this blog and lose yourself in the stunning arts and crafts our country has to offer. https://designdecoranddisha.com/dastkari-haat-the-convergence-of-indian-art-craft/ #art #craft #craftbazaar #dastkari #dastkarihaatsamiti #artisan #handmade #indianart #handicraftsofindia
A Yoga mat can become a breeding ground for bacteria, so it's essential to clean it from time to time. Here's how I do it: * Take equal parts of water and white vinegar or liquid soap. * Fill the solution in a spray bottle and spray it on the yoga mat covering it entirely. * Let the solution sit for 10-15 mins and then rub it gently either with a soft cloth or sponge. * Rinse with tap water to remove vinegar. Do not scrub or squeeze the mat. * Hang or lay it flat to dry. Hope this helps :) #yogamat #yogamatcleaning #cleaningtips #howtocleanyogamat #diycleaningsolution


2 Responses
Thanks for the information.
It's very informative post. Thanks for sharing